The Author – Bart Busschots
Creative Commons
Unless otherwise stated, the content on this site is licensed under Creative Commons Attribution, Noncommercial, No Derivative Works 3.0 License


Dec
26
The Orton Effect – A Quick Tutorial
Filed Under Computers & Tech, Photography on December 26, 2009 | 12 Comments
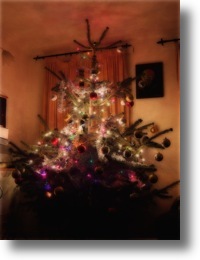 The Orton Effect is an old effect that dates back to the film days and involved combining an in focus and an out of focus version of the same shot into a single image to give a dreamy effect where the shot is blurred yet has all it’s detail. You can read (a little) more about it on Wikipedia.
The reason I’m writing this tutorial now is that Christmas trees with their lights on make great subjects for the Orton Effect. It’s very hard to get a nice photo of the Christmas tree that does justice to the atmosphere of the scene, but the dreamy quality of an Orton image can really help.
Jul
25
What’s the Story with Tonemapping?
Filed Under Photography on July 25, 2009 | Leave a Comment
I’ve become very fond of tonemapping as a photographic technique, and have mentioned it quite a few times in the descriptions of the photos I pick for my Photo of the Week blog posts. The more people see my tonemapped photos, and the more I mention tonemapping on Flickr, the more questions I get about it, so, instead of repeating myself over and over again, I figured I may was well just write an article about it that I can then link people to.
Lets start with some background, particularly with the concept of the dynamic range of a scene. You hear the term a lot, but I get a feeling a lot of people are not sure what it means. The simplest way I can describe it is as the difference between the brightest objects in the scene, and the darkest objects in the scene. Our eyes have quite a large dynamic range, at mid-day on a sunny day we can see both the things illuminated by the sun, and the things in shadow at the same time. Try that with a camera, and you’ll soon find that cameras have a much smaller dynamic range than our eyes. You’ll either end up with no detail in the shaded bits, or no detail in the bright bits, but try as you might, you won’t capture both! This is not a new problem, although it has gotten worse. Film has a bigger dynamic range than the JPEG images that come out of our digital cameras, but even film has a signifficatly smaller dynamic range than our eyes.
Aug
30
My Perl Image Processing Scripts
Filed Under Computers & Tech, Software Development, Photography, My Projects on August 30, 2008 | 6 Comments
Update (18 June 2012) – A more up-to-date version of these scripts can now be found here.
My Myers Briggs personality profile insists that I “prefer economy of effort”, you can probably translate that to “is a lazy sod”. Because of this I like automating repetitive tasks. It all started when I wanted a quick and easy way to prepare my images for posting to my website. I wanted them resized with my URL and the Creative Commons icon added in, and I wanted to be able to process a whole directory of images in one go. I started by playing around with the GD libs in PHP, but soon realised it would be quicker and easier to use Perl to shell out to the command line tools from Image Magick. At the time I wrote a post on my choice to do this which also contained the initial code. That code has been expanded and evolved since, and now includes functions for rendering nice (in my opinion) borders and titles on my better images. If you want to see examples checkout the Photo of the Week category on this blog..
[tags]Perl, Image Magick, script, programming, image processing[/tags]
Aug
26
A Quick & Dirty BibTex Cheat-Sheet
Filed Under Computers & Tech on August 26, 2008 | Leave a Comment
This is just a quick guide to getting BibTeX to work in a LaTeX document. This is not meant to be an introduction to BibTeX for someone who’s never heard of it, but rather a cheat-sheet for those of us who don’t use it quite often enough to remember the details without a little help.
First you need to create and manage your bibliography database (.bib file). You could do this by hand, but if you’re on OS X I’d highly recommend BibDesk. Much simpler.
Secondly, you insert citations in the document using the \cite{} command. Each entry in your bibliography database has a separate citation key, you use this key to insert a reference. For example, if my bibliography database contained a reference with a citation key ‘Busschots2008’ I’d insert a citation to that reference with the command:
\cite{Busschots2008}
Thirdly, you need to include your bibliography in your document. To do this you need to set a style for it, and then include it. If you’re not sure what style to use start with plain. Assuming your bibliography database is in a file called Sample.bib, you’d include it with the following code (notice that you don’t add .bib to the end of the file name):
\bibliographystyle{plain}
\bibliography{Sample}
Finally, to render the document you now need to run your document through both BibTex and LaTeX in the following order:
latexbibtexlatexlatex
Jul
20
Selective Colour With The GIMP
Filed Under Photography on July 20, 2008 | Leave a Comment
 This is how I do selective colour using the GIMP. I’m not claiming it’s the only way, or even the best way. I just know it works. This technique has a few powerful features though. Firstly it’s non-destructive, secondly it allows for partial de-saturation, thirdly it allows the channel mixer to be used to generate a very good black & white version of the image, thirdly, it allows for a controlled boost of the colour in the colour areas. This give you much more control, but it also makes the technique a little more complex than many other techniques you’ll find out there.
[tags]GIMP, Selective Colour, Tutorial, Image Processing, Photography[/tags]
Apr
30
Configuring Your Eircom Router Securely
Filed Under Computers & Tech, Security on April 30, 2008 | 5 Comments
It seems like a long time since my first article pointing out the security problems with Eircom’s default wireless setup. At the time I got a few requests for screen shots but couldn’t deliver since I don’t have one of these Eircom routers myself. Last week a very kind reader contacted me and asked if I’d like some screenshots. I happily accepted and used them to illustrate this post showing the step-by-step instructions Eircom customers can take to improve their security. As always this post comes with no warranty of any sort. Although I am quite knowledgeable on these matters I do not pretend to be an expert and as this advice is free I will accept no liability what so ever for any undesirable outcomes which anyone may experience while following these instructions. I have of course done my best to ensure the instructions are clear, concise and correct. These instructions are for Eircom customers with the recent Netopia wireless routers Eircom provide as standard to home users.
[tags]Eircom, Wireless, Wifi, security, WEP, WPA, router, Netopia[/tags]
Apr
16
My Tilt-Shift Instructions for GIMP
Filed Under Computers & Tech, Photography on April 16, 2008 | 25 Comments
In my first article on simulating tilt-shift miniature faking with the GIMP I linked to instructions from Gimparoo!. Firstly, these instructions are no longer completely correct on the latest version of the GIMP because some of the menu sequences used have changed. Secondly, I’ve been looking at other sets of instructions on the web for doing this with PhotoShop and comparing them to the Gimparoo! instructions (particularly these instructions). What I’ve found is that the Gimparoo! instructions are not entirely complete so I’ve decided to write my own.
As usual I want to stress that I am not making any claims that these instructions are in any way definitive. There may well be WAY better ways of doing this. What I’m saying is that this is the best way I’ve found of doing it so far and that it works for me.
[tags]Tilt-shift Photography, Tilt-shift, photography, GIMP, miniature faking, photo editing[/tags]
Apr
14
Tilt-Shift Photography With the GIMP
Filed Under Photography on April 14, 2008 | 3 Comments
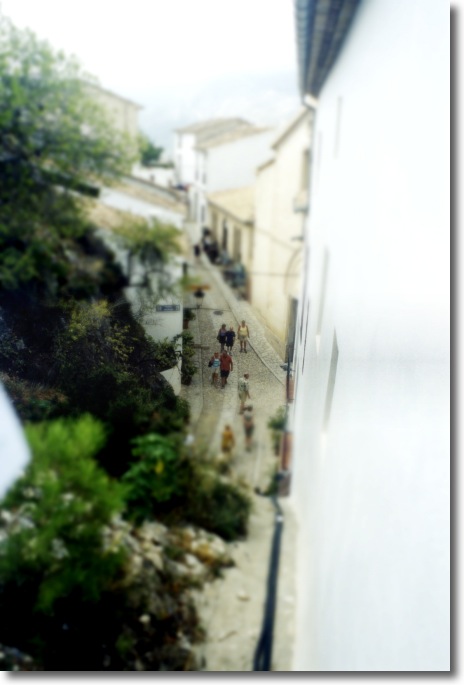
Tilt-Shift photography is an interesting technique which can be used to make the real world look like a miniature model. The ‘right’ way to do it is with a special Tilt-Shift lens but they are not cheap. Hence, people have found ways of cheating by taking the shot with a regular lens and then adding in the Tilt-Shift effect later during post-processing. I found a nice tutorial for doing this with the GIMP today so I figured I’d give it a go.
Unfortunately it takes a certain kind of shot for this to work well and it turns out I don’t have any well-suited images in my library. I did find one shot that was close to what was needed so I had a go with that. The results aren’t great but I guess it gives some sort of idea of what I’m on about. I’m going to keep an eye out for opportunities for taking suitable shots and should I succeed I’ll post back with my results. In the mean time, here’s some examples of how it should be done.
Update (16 April 2008): I’ve created my own more current and more detailed tutorial here.
[tags]Tilt-Shift, Photography, GIMP[/tags]
Apr
10
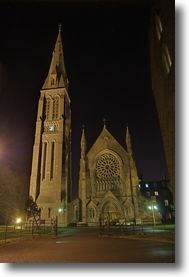
HDR at Night
Filed Under Photography on April 10, 2008 | 5 Comments
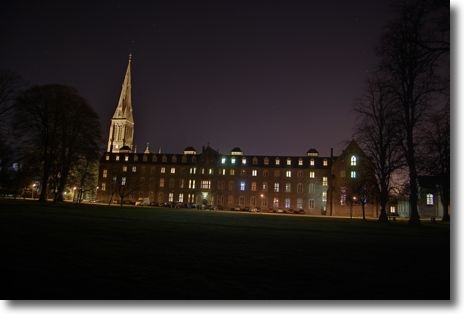
Continuing my experimentation with HDR photography I had a go shooting night-scenes in HDR. Since buildings at night tend to have a very high dynamic range I figured I should get better results with HDR than without. I certainly wasn’t wrong. What you do have to bear in mind is that exposures will be long and you’ll need a lot of them. I actually pushed the camera as far as it would go in both directions of exposure compensation to get some of these shots. The sample below is composed of 7 exposures, the longest being 10 seconds, but for a few of the shots some component exposures went as high as 30 seconds.
What I do really need to learn though is to check that my tripod is level before shooting! What should have been my favourite image from the night was spoiled a little by a sloping horizon. I’ve included it below regardless because it still shows the potential pretty well.
You can see all my shots from Tuesday night in my gallery (not all are HDRs but all HDRs are tagged and labelled as such).
[tags]HDR photography, nigth-time photography[/tags]
Apr
8
HDR Revisited
Filed Under Photography on April 8, 2008 | 5 Comments
 Since I wrote my article on HDR a few weeks ago myself and Allison also discussed it on our Chit-Chat Across The Pond segment on the NosillaCast. When just talking about it left quite a few listeners a little confused Allison asked me to screen cast my workflow for creating an HDR image. I made it clear in my original article and on the NosillaCast that I was just describing my way of doing HDR, and that I wasn’t claiming it was the best way, or the right way. I also included quite a few examples of images produced with my workflow in my original article so people could clearly see the kind of results my workflow can generate. Since writing that original article two new and interesting pieces of information have come my way so I thought I’d re-vist the topic to expand on it a little.
[tags]HDR, Photography[/tags]