Aug
30
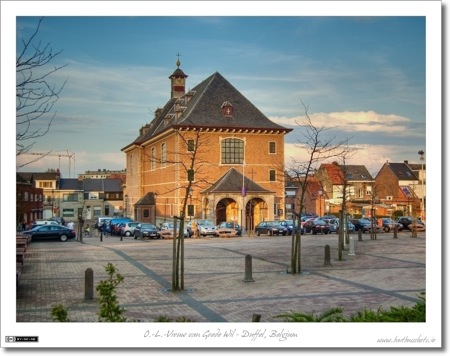
Photo of the Week 80 – O.-L.-Vrouw van Goede Wil
Filed Under Photography on August 30, 2009 | Leave a Comment
In some ways this photo is a continuation of an ongoing theme in my recent Photo of the Week instalments – photos shot during the Golden Hour and then tonemapped to bring out the best in them. However, unlike the previous examples, this shot was not taken in Ireland, but rather in my native Belgium.
Although I was baptised into the Catholic Church, we’ve parted ways in the almost 30 yeas that have elapsed since then. However, despite me turning my back on the church (not the ideals of Christianity, just institutionalised Christianity), I still love church Architecture. Churches are usually designed with great care, and are often the most beautiful buildings in a town. This is not just any church though, it’s one of the churches in my home village of Duffel in Belgium, it’s also the church myself and my brothers were baptised in (at least I think all three of us were baptised here). This is not the biggest church in Duffel, but, in my mind, it’s the one with the most character.
The full name of the church is Onze Lieve Vrouw van Goede Wil, but you almost never see it written like that, on paper or signs you’ll generally see it as O.-L.-Vr. van Goede Wil or O.-L.-Vrouw van Goede Wil. In English that roughly translates to Our loving Lady of good will, in other words, it’s a church dedicated to the virgin Mary. Today it’s a small church in a small parish in a small village in the Belgian countryside, but in the past it was a place of pilgrimage. A supposedly miraculous statue of the virgin mother was found in a Willow tree growing in a marshy field where the church now stands.
- Camera: Nikon D40
- Lens: Nikon DX AFS 18-55mm (D40 kit lens)
- Exposure: 1/640 sec
- Focal Length: 32mm
- Focal Ratio: f/4.5
- ISO: 400
- Camera Mode: Aperture Priority
- Processing: Generated by tonemapping a single RAW file in Photomatix Pro and then selectively tweaking the exposure slightly using the Dodge & Burn plugin in Aperture.
Aug
24
Photo of the Week 79 – Pike Bridge Re-Visited
Filed Under Photography on August 24, 2009 | 1 Comment
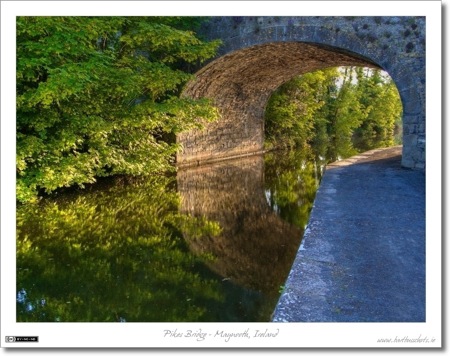
If this week’s instalment reminds you a lot of last week’s, that’s no coincidence, this week’s shot is also of Pike’s Brige, and also shot at the same time of day, the so-called golden hour around sunset. There are some marked differences though, last week’s shot was taken into the sun, this week’s is taken with the sun directly behind the camera – meaning this is the opposite side of the bridge. Although the conditions look identical, the shots were actually taken two days apart.
- Camera: Nikon D40
- Lens: Nikon DX AFS 18-55mm (D40 kit lens)
- Exposure: 1/500 sec
- Focal Length: 42mm
- Focal Ratio: f/8
- ISO: 400
- Camera Mode: Aperture Priority
- Exposure Bias: -0.3EV
- Processing: Generated by tonemapping a single RAW file in Photomatix Pro
Aug
16
Photo of the Week 78 – Evening at Pike Bridge
Filed Under Photography on August 16, 2009 | 3 Comments
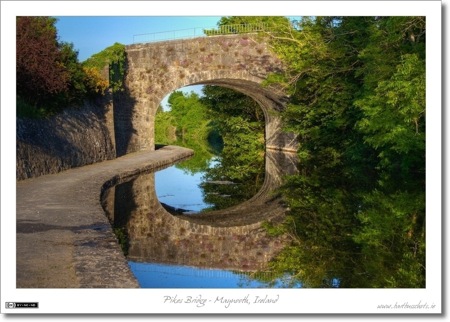
Photography is all about light, and you get some of the nicest light each day in the hours around sunrise and sunset, or the so-called ‘golden hours’. I’m not a fan of early mornings, so, for me, there is only one golden hour each day, but some of my very favourite pictures are taken during that hour, including this one.
I got this photo on an evening when I wasn’t really planning to shoot, I was out getting some much-needed exercise, and brought the camera along ‘just in case’. I’m certainly glad I did. The light was superb, and it’s very rare that the water is this still under the bridge. The dynamic range was very large in this shot so I tonemapped the RAW file in Photomatix Pro to recover both the shadows and the highlights. I have also edited this image for use as a desktop wallpaper on either a standard (4:3) or widescreen (16:10) monitor.
This is Pike Bridge between Maynooth and Leixlip in Co. Kildare, Ireland. It has two arches, one crossing the Dublin to Sligo railway line, and this one crossing the Royal Canal.
- Camera: Nikon D40
- Lens: Nikon DX AFS 18-55mm (D40 kit lens)
- Exposure: 1/80 sec
- Focal Length: 20mm
- Focal Ratio: f/8
- ISO: 400
- Camera Mode: Aperture Priority
- Exposure Bias: -1.0EV
- Processing: Generated by tonemapping a single RAW file in Photomatix Pro
Aug
12
Photo of the Week 77 – Ennis Friary
Filed Under Photography on August 12, 2009 | 1 Comment
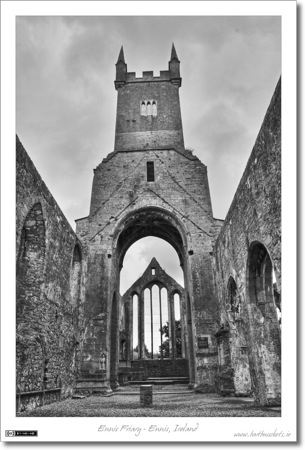
This is my 67th Photo of the Week, yet it is only the second monochrome image to make it into the series. I think this is because I absolutely adore colour, and feel rather out of my depth when colour gets extracted from the equation. It took me hours to process this shot the first time, then I got some feed back from people on a few flickr groups, and then it took me another hour or so to have another go and come up with something I not just liked, but liked a lot. Most of the time I only revert to monochrome as a fall-back, but I’m going to try change that, and spend more time experimenting with monochrome precisely because I’m not comfortable with it.
Returning to this image, I reverted to monochrome here because I didn’t have a choice. I had once chance to get a short visit to the priory, so I had to make do with what ever I got – which was mostly rain! At the very end I got a few shots in good sun, but I didn’t have the opportunity to re-shoot this shot in sun because of time pressures. So, what I got was an image with a blown out sky, a flat looking stone building, and almost no colours to speak of. I was either going to bin it, or go monochrome. Determined not to waste the shot, I went for the monochrome option – deciding texture was going to be what I needed to concentrate on – in particular, I wanted to recover details in the sky, and enhance the details in the stonework of the building.
Since I’d shot in RAW I started by tone-mapping the image to recover detail in the sky, and also to enhance details in walls. Then I converted to monochrome using the monochrome mixer in Aperture, before using Aperture’s dodge & burn plug-in to correct some side effects of the tone-mapping and to pick out the spire of the church a little better. After seeking and getting some opinions from others I also used some pretty dramatic levels adjustments to really push up the contrast and really make those textures jump out.
- Camera: Nikon D40
- Lens: Nikon DX AFS 18-55mm (D40 kit lens)
- Exposure: 1/400 sec
- Focal Length: 18mm
- Focal Ratio: f/8
- ISO: 400
- Camera Mode: Aperture Priority
- Processing: Generated by tonemapping a single RAW file in Photomatix Pro, then converting to monochrome in Aperture, dodging & burning in Aperture, as well as applying some other tweaks in Aperture.
Aug
5
Photo of the Week 76 – A Painted Lady
Filed Under Photography on August 5, 2009 | 1 Comment
Last week’s photo of the week was the result of serendipity – this weeks is the inverse, it’s the result of planning and dogged determination.
I was, and indeed still am, working on a long-term project to photography all 28 species of butterfly that live in Ireland (you can follow my progress here). I’d been keeping an eye on the different species I saw flying around each time I came outside – and the day before I’d seen that there were Painted Ladies on the wing – a species I was missing!
The time was right, the weather was right, so I chose a spot (the Junior Gardens on the St. Patrick’s College campus in Maynooth), grabbed my gear, and set out on my mission to capture a Painted Lady. I was in a great mood, full of anticipation, but I wasn’t expecting a quick result. Butterflies never do what you tell them, and rarely do what you’d like!
I waited. Then I waited some more. Then a little more. Finally, out of the corner of my eye I spotted one! A Painted Lady. But it didn’t sit still. It flew from flower to flower never landing long enough to even get a focus lock. Then it flew over the wall and out of sight. On the one hand it was a relief to see that my quarry was indeed around, and that I’d chosen my spot correctly. On the other hand, it was a frustrating near-miss. But I continued to wait. Slowly and watchfully walking around around and around the garden.
Eventually another Painted Lady came into the garden. This one was a little more co-operative, landing on flowers and feeding – but not in a very photogenic way. I shot about 25 shots of this guy, but none were good enough to make it here. I waited some more. Another one, this one was feeding on fabulous pink Daisies, and what’s more the Daisies were tall enough to throw the other plants near them totally out of focus when I got in close with the 55-200mm. The setting was perfect, vibrant colours and a lovely bokeh. BUT, my winged friend insisted on landing on low-down flowers, hence always being half-obsgtructed by one or more taller flower heads. I didn’t get the perfect shot, but I could now see it in my head. It was a Painted Lady on one of these pink Daisies with that fabulous green bokeh. all I had to do now was wait.
I stopped making my rounds of the garden and stood watch over my perfect setting. It took another half an hour, but in the end, I was rewarded with the shot you see here. In all I spent two hours trying to get this shot. I think it was time well spent! (don’t worry, I wasn’t bored, I had my iPhone with me and was listening to Photo Focus – doing as the jingle instructs – making pictures, not just taking pictures!)
- Camera: Nikon D40
- Lens: Nikon DX AFS 55-200mm
- Exposure: 1/1600 sec
- Focal Length: 200mm
- Focal Ratio: f/8
- ISO: 400
- Camera Mode: Aperture Priority
- Exposure Bias: -0.7EV
Jul
28
Photo of the Week 75 – Into an Uncertain Sky
Filed Under Photography on July 28, 2009 | 2 Comments
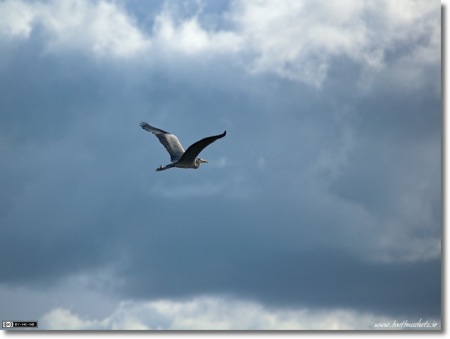
I have a theory that there are two very different ways to come home with a great photo, meticulous preparation, and the ability to capitalise on serendipity. Meticulous preparation speaks for itself, you plan what it is you are going to shoot, how you are going to shoot it, and you do as much research as possible up-front so you know where to be when and with what gear. The second type of great shot comes from a completely different skill, awareness. I seldom go out with my camera without a plan, and I usually come home with the shots I’d planned, but, I don’t limit myself to the plan, I’m constantly on the lookout for unexpected shots. Serendipity can provide for some superb shots, if you just remember to stay alert for the call of opportunity.
In many way’s I’m proud of the fact that most of the shots that make it to this series were in some way planned. But, that doesn’t stop me loving it when I get a totally expected shot because I happened to be in the right place at the right time with the right gear, and aware enough of my surroundings to realise that fact. That’s exactly what happened when I shot this week’s instalment.
- Camera: Nikon D40
- Lens: Nikon DX AFS 55-200mm
- Exposure: 1/200 sec
- Focal Length: 200mm
- Focal Ratio: f/5.6
- ISO: 200
- Camera Mode: Aperture Priority
- Exposure Bias: -0.7EV
- Processing: Used the Dodge & Burn plugin in Aperture to lighten the bird a little to help it stand out from the background.
Jul
25
What’s the Story with Tonemapping?
Filed Under Photography on July 25, 2009 | Leave a Comment
I’ve become very fond of tonemapping as a photographic technique, and have mentioned it quite a few times in the descriptions of the photos I pick for my Photo of the Week blog posts. The more people see my tonemapped photos, and the more I mention tonemapping on Flickr, the more questions I get about it, so, instead of repeating myself over and over again, I figured I may was well just write an article about it that I can then link people to.
Lets start with some background, particularly with the concept of the dynamic range of a scene. You hear the term a lot, but I get a feeling a lot of people are not sure what it means. The simplest way I can describe it is as the difference between the brightest objects in the scene, and the darkest objects in the scene. Our eyes have quite a large dynamic range, at mid-day on a sunny day we can see both the things illuminated by the sun, and the things in shadow at the same time. Try that with a camera, and you’ll soon find that cameras have a much smaller dynamic range than our eyes. You’ll either end up with no detail in the shaded bits, or no detail in the bright bits, but try as you might, you won’t capture both! This is not a new problem, although it has gotten worse. Film has a bigger dynamic range than the JPEG images that come out of our digital cameras, but even film has a signifficatly smaller dynamic range than our eyes.
Jul
19
Photo of the Week 74 – Commuter Reflections
Filed Under Photography on July 19, 2009 | Leave a Comment
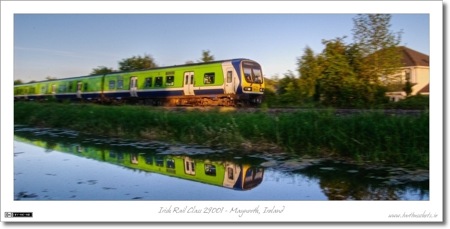
This week’s photo of the week came close to being binned. It really didn’t look like much before tonemapping, and even then, it’s technically imperfect. ‘Pixel Peepers’ would be horrified by the noise down in the bowls of this image, they’d also notice that the focus on the nose of the train is a little soft. Also, anyone can see that the motion blur is not as strong as it could be, and indeed, probably should be. Even after tonemapping, cropping, and quite a few tweaks in Aperture, I initially gave this image a low rating, three out of five to be precise. But, each time I scanned back through the project, the image kept jumping out at me. It kept grabbing my eye. First I increased it to 4 stars. Then, recently, 5 – my threshold for consideration for Photo of the Week.
I’ve spent a lot of time looking at the image to figure out why it kept catching my eye. I’ve figured out at least some of the things I like about it. The most obvious one being, it has a train in it! I also love reflections, so that’s a definite second reason. I also love the soft evening light, it really makes for great photos, but in this case it took tonemapping to bring out that wonderful light. Finally, I’ve always had a thing for panoramic crops.
- Camera: Nikon D40
- Lens: Nikon DX AFS 18-55mm (D40 kit lens)
- Exposure: 1/50 sec
- Focal Length: 18mm
- Focal Ratio: f/18
- ISO: 400
- Camera Mode: Shutter Priority
- Processing: Generated by tonemapping a single RAW file in Photomatix Pro.
Jul
12
Photo of the Week 73 – Holly in Bloom
Filed Under Photography on July 12, 2009 | 1 Comment
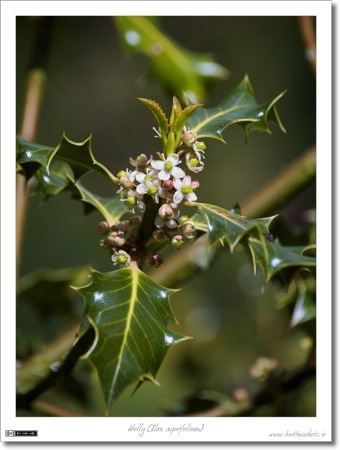
It’s been a long time since I’ve posted one of my flower shots, so this week I’m sharing my favourite flower pick of the year so far. We all know how lovely red Holly berries (Ilex aquifolium) are around Christmas time, but very few people ever notice the delicate white flowers from which those berries come. This shot shows a closeup look at a Holly branch in bloom. This tree is growing in the Junior Gardens on the St. Patrick’s College campus (AKA NUI Maynooth South Campus) in Maynooth, Ireland.
- Camera: Nikon D40
- Lens: Nikon DX AFS 55-200mm
- Exposure: 1/1600 sec
- Focal Length: 130mm
- Focal Ratio: f/8
- ISO: 400
- Camera Mode: Aperture Priority
- Exposure Bias: -0.7EV
Jul
4
Photo of the Week 71 & 72 – A Cavan Sunset
Filed Under Photography on July 4, 2009 | 4 Comments
I’ve found myself one week behind yet again, so, for what seems like the millionth time, I’m doing a double-post this weekend. As always with these multiple posts, I’m choosing two related photos, in this case, VERY related photos, they were both taken within a few minutes of each other of the very same subject! The reason I’ve chosen to do these together is because they show two approaches to the same situation.
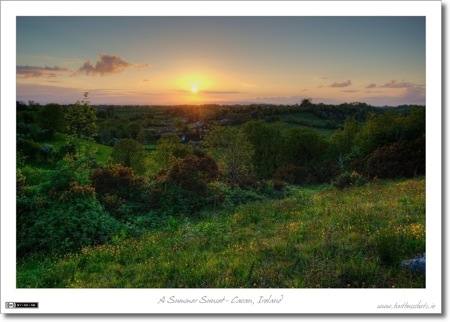
When you shoot a sunset the dynamic range is exceptionally high. You are shooting into the sun, and at the same time, the ground is getting dark, so, you have a very bright subject, with very dark surroundings. The range between the brightest and darkest range of the scene is just too big for a camera to take in. This leaves you with a choice between two approaches, both of which can make for fantastic photos.
As a complete geek, my first reaction is to throw technology at the problem. Although the technology I threw at the problem is quite modern (HDR photography), the idea is not new. In the past people would use graduated filters to solve the same problem. With a graduated filter the top of the filter blocks quite a lot of light, the bottom, none. You can get filters that have very abrupt graduations where half the filter is dark, the other half completely transparent with a very short transition between the two regions, or you can have filters that go smoothly from dark to light over the entire length of the filter. Different situations will call for different filters, but the aim is the same, get both the bright bits and the dark bits properly exposed despite the large difference in brightness between them (i.e. the large dynamic range). I don’t own any filters, so that’s not what I did. Instead, I used a technique called Tonemapping on a RAW file. The result is that you can see detail in both the bright sky and the dark landscape in this shot, which is the first of my two photos for this week:
- Camera: Nikon D40
- Lens: Nikon DX AFS 18-55mm (D40 kit lens)
- Exposure: 1/320 sec
- Focal Length: 18mm
- Focal Ratio: f/8
- ISO: 200
- Camera Mode: Aperture Priority
- Exposure Bias: -1.0EV
- Processing: Generated by tonemapping a single RAW file in Photomatix Pro.
So that’s an example of taking the first option for dealing with a high dynamic range, use technology to get around it. So what’s the second option? Don’t fight it, accept it, and use it! If you can’t get everything exposed properly, don’t even try, instead, intentionally only expose for one element. With a sunset that one element is the sky, and then you intentionally throw the rest into silhouette. You intentionally take away all exposure in your foreground! This can result in a lot of black space in your image, so you often have to crop pretty hard to make this work well. An example of this is the second image I’ve chosen for this week:
- Camera: Nikon D40
- Lens: Nikon DX AFS 18-55mm (D40 kit lens)
- Exposure: 1/640 sec
- Focal Length: 55mm
- Focal Ratio: f/8
- ISO: 200
- Camera Mode: Aperture Priority
- Exposure Bias: -2.0EV


