Nov
24
Automatically Adding Screenshots to Yoink with Hazel (Take 1)
Filed Under Computers & Tech, Automation on November 24, 2017 at 12:24 am
Note: based on feedback from Hazel via Twitter I’ve improved on this original Hazel rule, described separately here.
One of my favourite app discoveries of 2017 has been Yoink — a Mac an iOS app that revolutionaries drag-and-drop by simply providing a shelf where you can temporarily store anything drag-and-dropable as you switch between windows, apps, and even spaces. I reviewed Yoink on episode 496 of the Chit Chat Across the Pond podcast.
Anyway, I use the Yoink all the time, but, it’s missing what I believe would be a fantastic feature — the automatic addition of screenshots to the Yoink bar as you take them.
I contacted the developer to suggest/request this as a feature, and he didn’t seem all that interested in adding it, but, he did make two suggestions for how I could go about getting the functionality I wanted indirectly. He made two suggestions — buy a different app of his, ScreenFloat, which is specifically for managing screen shots, or, build an automator script to take screenshots and send them to Yoink.
This week I finally found a simple solution I’m happy with — Hazel combined with a simple terminal command.
Hazel is one of those apps that’s both a one-trick pony, and, an app with nearly limitless potential to do cool things. It’s one trick is to watch the filesystem for events, and to take actions in response. It’s the fact that those actions can be almost anything makes Hazel so powerful.
In this case, the problem to be solved is that each time a new screenshot is taken it needs to get added to Yoink.
Unless you start tweaking the settings using terminal commands, macOS saves screenshots to the desktop and names them Screen Shot YYYY-MM-DD at HH.MM.SS.png, e.g. Screen Shot 2017-11-22 at 22.30.10.png.
So, the problem we are trying to solve is really that we want to watch the desktop for new files appearing with names that starts with Screen Shot, and when such files appear, they should be be opened with Yoink. That now sounds like exactly the kind of thing Hazel was designed to do!
Since screenshots appear on the desktop, we want to add a Hazel rule to that folder. To do that, start by opening the Hazel preference pane, and selecting the Folders tab.
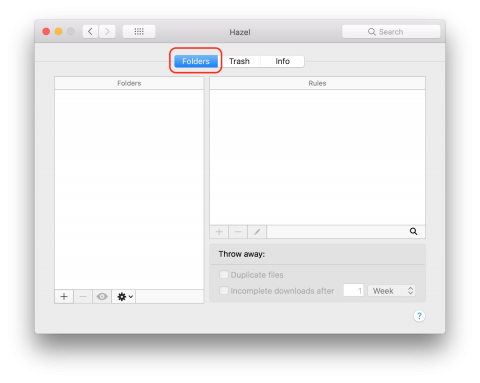
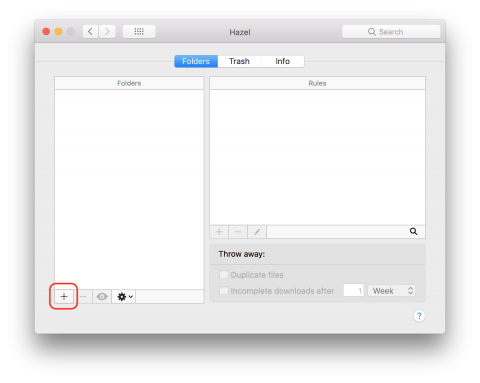
Hazel rules are added per-folder, so if you don’t already have the desktop folder in the left pane, add it with the plus button in the bottom-left corner:
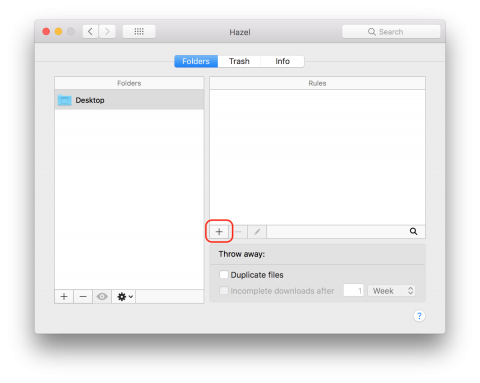
Once the desktop is added, select it, and add a new rule to it using the plus button in the right panel:
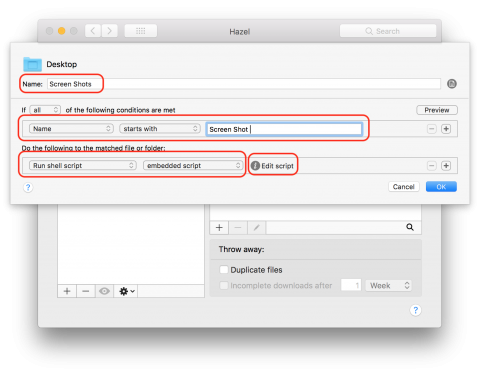
You can name the rule anything you like, but I chose Screen Shots. We need to limit our rule to files with names starting with Screen Shot, so we need just one condition – Name starts with Screen Shot.
For matching files we just need one action — Run shell script with an embedded script.
When you have the name, condition, and action entered, press the Edit script button to configure the shell script.
When editing the script, set the Shell to /bin/bash, and enter the following single-line script:
/usr/bin/open "$1" -a /Applications/Yoink.app
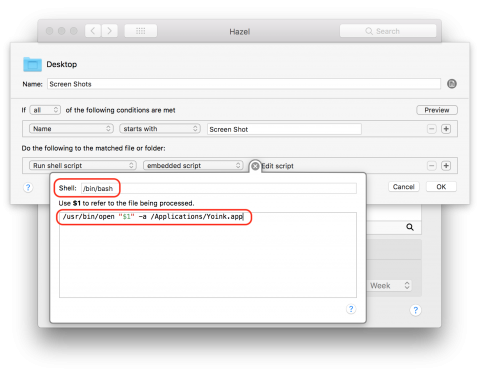
As the Hazel shell editor conveniently tells you when you set the shell to BASH, the matched file will be available to your command as $1, so we are calling the open command with one argument, the file, and the -a flag with the path to Yoink.
As its name suggests, the open command opens a file. By default it opens files with the default app for their extension, but you can specify the app to use with the -a flag. BTW, we covered the open command in more detail in Taming the Terminal part 22.
Putting it all together, our Hazel rule watches the desktop for new files with names starting with Screen Shot, and when such files appear, it opens them with Yoink.
Finally, with Hazel’s rule sync feature, you only have to set this rule up once, and then let it sync to all your Macs.
One of the things I love most about being a Mac user is that there are so many ways to bridge the gap between the command line and the GUI, and, that there are so many ways to quickly and easily add powerful automation to the GUI. This is just the latest example to underline my point!


[…] Note: This is an improved version of my original solution to this problem. […]
[…] Automatically Adding Screenshots to Yoink with Hazel (Take 1) : Bart Busschots and Automatically adding Screenshots to Yoink with Hazel (Improved) : Bart Busschots […]