Apr
30
Configuring Your Eircom Router Securely
Filed Under Computers & Tech, Security on April 30, 2008 at 2:17 pm
It seems like a long time since my first article pointing out the security problems with Eircom’s default wireless setup. At the time I got a few requests for screen shots but couldn’t deliver since I don’t have one of these Eircom routers myself. Last week a very kind reader contacted me and asked if I’d like some screenshots. I happily accepted and used them to illustrate this post showing the step-by-step instructions Eircom customers can take to improve their security. As always this post comes with no warranty of any sort. Although I am quite knowledgeable on these matters I do not pretend to be an expert and as this advice is free I will accept no liability what so ever for any undesirable outcomes which anyone may experience while following these instructions. I have of course done my best to ensure the instructions are clear, concise and correct. These instructions are for Eircom customers with the recent Netopia wireless routers Eircom provide as standard to home users.
[tags]Eircom, Wireless, Wifi, security, WEP, WPA, router, Netopia[/tags]
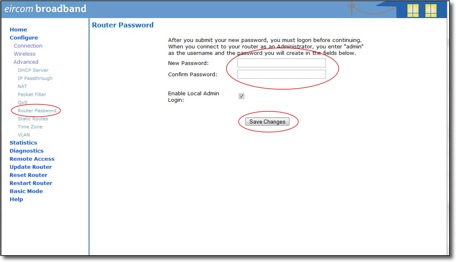
First I’ll show you how to set a password on your router. This will prevent malicious software or webpages from altering your router’s configuration behind your back.
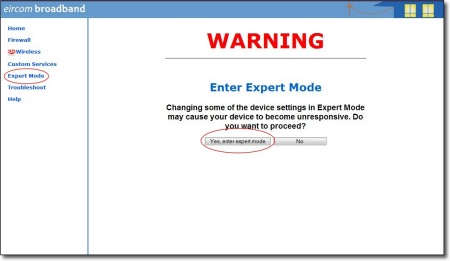
- Select the
Expert Modelink in the left-hand side bar of your router configuration page. - On the new page that generates click the
Yes, Enter Expert Modebutton. This will change the left-had menu bar revealing many more options - In the now expanded left menu bar click
Router Passwordlink - Enter the password you wish to set twice and click the
button - REMEMBER THIS PASSWORD!
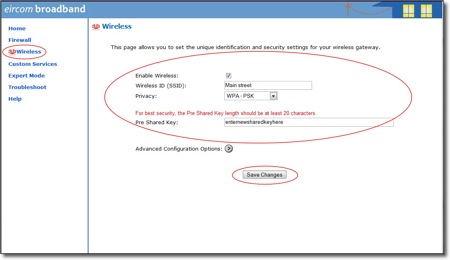
Next I’ll show you how to change the security settings to protect you from the now well known exploit in the old default configurations of these routers and to improve the encryption of your network. This should substantially improve the security of your wireless network as compared to the default setup.
- Click to the
Wirelesslink on the left-hand side bar. All the settings we want to change will be on the new page this opens - Change the
Wireless ID (SSID)to something unique for you. If it’s the same as any of your neighbors there will be problems. - Change the
Privacydrop-down fromWEP - AutomatictoWPA - PSK - Enter a custom
Pre Shared Key. This must be long and hard to guess. It shoudl be 20 characters at the very least and should ideally be longer and generated with a random password generator like the one on GRC. You will have to enter this key on all machines that connect to your network so you might want to save it in a text file and put it on a USB stick so you copy and paste it in rather than having to type it. - Click the
Save Changesbutton.


[…] Configuring Your Eircom Router Securely […]
[…] Configuring Your Eircom Router Securely […]
cheers mate, just secured my router, thanks for the help
Cheers Bart. Good advice & instructions, Thanks a mill!
[…] If you suspect you are affected, then follow the link below and see if we can deduce your password. If you are affected contact us and we will be happy to help. You can also find DIY instructions on how to secure your Netopia router here. […]